Tampa's HVAC Services | License #: CAC1818057A
Plumbing License | License #: CFC1433906
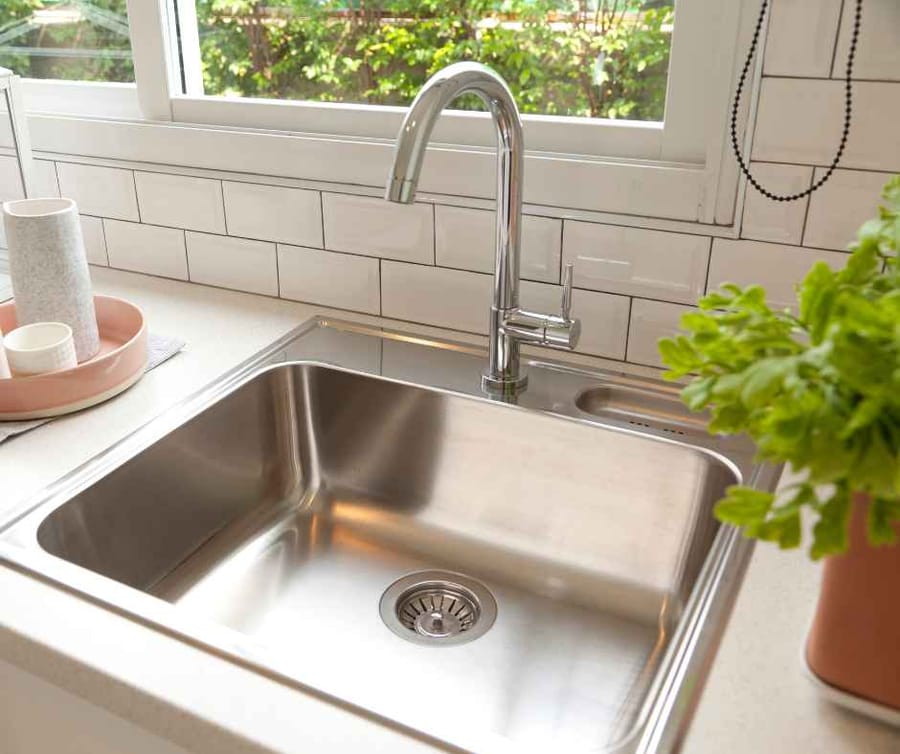
Drop-In Sink Installation
Drop-in sinks are among the most common sink styles in kitchens, laundry rooms, and utility spaces. Instead of being mounted beneath the countertop, the sink is installed from above, so the rim rests on the countertop surface.
This design makes drop-in sinks easier to replace when an older plumbing fixture wears out or when homeowners want to update their kitchen without modifying the countertop itself.
Many homes already have counters designed for this sink style. When that’s the case, installing a new drop-in model is often a straightforward process that focuses on removing the old unit, preparing the opening, and sealing the new sink properly so it performs reliably for years.
We look forward to giving you the comfort, health, and peace of mind you deserve.
What Is a Drop-In Sink?
A drop-in sink installs from the top of the countertop rather than from underneath.
The opening in the counter is cut slightly smaller than the sink’s outer rim. When the sink is lowered into that opening, the rim supports the fixture’s weight, while mounting clips underneath hold it securely in place.
A waterproof seal is applied between the sink and the countertop to prevent water from reaching the cutout edges.
Because the sink sits on the surface instead of hanging beneath it, drop-in installations tend to work well with a wide range of countertop materials, including laminate, tile, wood, and many stone surfaces.
When Homeowners Choose Drop-In Sink Replacement
Drop-in sinks are often installed when replacing an existing sink rather than during a full kitchen renovation.
In many kitchens, the original countertop was designed specifically for a drop-in model, which makes replacing it with the same style the most practical option.
Homeowners typically install a new drop-in sink when:
-
The existing sink has rust, stains, or surface damage
-
The seal around the rim has begun leaking
-
A deeper or larger basin is preferred
-
Kitchen fixtures are being updated during a refresh
Since the sink installs from above the counter, it usually avoids the structural changes that undermount sinks sometimes require.
How Drop-In Sink Installation Works
While every kitchen setup is slightly different, most drop-in sink installations follow a similar process once the plumbing connections are accessible.
A typical installation involves:
-
Disconnecting the drain assembly, water supply lines, and any attached garbage disposal
-
Releasing mounting clips underneath the countertop and removing the existing sink
-
Cleaning the countertop opening to remove old sealant and debris
-
Checking the size and shape of the cutout to confirm the new sink will fit properly
-
Applying waterproof sealant around the sink opening
-
Lowering the new sink into position so the rim rests evenly on the countertop
-
Securing the sink with mounting hardware underneath the counter
-
Installing the drain assembly and reconnecting the plumbing
-
Running water through the system to confirm that the sink drains correctly and no leaks are present
Once the installation is complete, the seal around the rim prevents water from reaching the countertop opening below.
Materials Commonly Used for Drop-In Sinks
Drop-in sinks are manufactured in several different materials. While the installation process is similar, the weight and mounting hardware can vary by model.
-
Stainless Steel: One of the most widely used materials in kitchens due to its durability and corrosion resistance.
-
Granite Composite: Heavier than stainless steel and known for its resistance to scratches and staining.
-
Porcelain and Cast Iron: Often found in traditional kitchen designs. These sinks have a heavier construction and require careful handling during installation.
Material choice typically affects maintenance and appearance more than the overall installation method.
Issues Sometimes Found During Sink Replacement
Removing an older sink occasionally reveals conditions that weren’t visible while the fixture was in place.
In some kitchens, the original seal around the sink may have failed over time, allowing moisture to reach the edges of the countertop cutout. When that happens, the area may need to be cleaned and dried before the new sink is installed.
Another common situation involves countertop openings that were cut slightly larger than standard sizes. In those cases, selecting a sink with a wider rim ensures the opening remains fully covered once the new unit is installed.
Plumbing alignment can also vary depending on the new sink’s basin depth and drain location, which may require minor adjustments to the drain assembly beneath.
$200 OFF
Blown-In Insulation*with qualifying purchase
813.355.8898
Limit per 1 per person. Not valid with other offers. Call for more details. Expires Mar 31, 2026.
Frequently Asked Questions
Plumbing Upgrades Often Done During Sink Installation
Sink replacement is often a convenient time to update other kitchen plumbing components since the connections are already being removed during the installation.
Common upgrades completed during sink installation include:
-
Faucet installation
-
Sink drain replacement
Handling these updates during the sink installation process helps avoid reopening the plumbing later.
Schedule Drop-In Sink Installation with The Comfort Authority
If your kitchen sink is leaking, worn out, or ready for an upgrade, professional installation ensures the new fixture is properly sealed and connected to the plumbing system without issues.
The Comfort Authority installs and replaces drop-in sinks for homeowners throughout Tampa and surrounding communities, helping ensure sinks sit securely, drain properly, and hold up to daily use.
If you’re planning a sink replacement or updating kitchen fixtures, our team can help handle the installation from start to finish. Contact The Comfort Authority today to schedule drop-in sink installation.
Schedule Your Appointment Below
REVIEWS
What Our Clients Say

The technician Ura was excellent, fully explaining what he would be doing and showing me details about my two units.. This is the second time he came to fix an issue and’s I had requested him. He did not leave until he fixed the problem and he had to go to my very uncomfortable crawl space to do it. I recommended them highly them . I also added some extra equipment to my system, it was costly but well worth it to for my health. Susan
— Susan Elbare | Google Review
Glenn was able to quickly diagnose the problem with our unit and reprogram the thermostat for a quick solution. Appreciate the Comfort Authority always being quick and responsive.
— Tempe Zucker | Google Review
03/20/26
Mr Sanchez came out today on time to replace leaky coil that was still under warranty.
He was great and quickly took care of the problem without any issues. Mr. Sanchez was very pleasant to work with and very respectful of my household. He did a fantastic job.
Once again, The Comfort Authority was great to deal with. Very helpful and quickly responded to the issue at hand.
12/1124
Luis came out today formy yearly service. He was great and very thorough.
Found no issues! Great guy and great company.
07/09/24
My ac stopped working last nite. I called Comfort Authority early this morning and the tech was here within 3 hours. Chase Prather was able to find and fixed the issue right away.
He was very helpful and extremely great to work with. It turned out that the part and labor were under warranty so it was fixed at no cost.
I took the opportunity to install a surge protector for the unit which Chase installed immediately.
Thanks Chase, you were great.
Thank you Comfort Authority for always delivering great service.
Forgot to state previously how great David Hood was. Showed up on time and had the ac working right away. He explained everything he was doing step by step explained how it could be avoided in the future with very helpful tips. Great service! Mr. Hood was a class act all the way.
6/16/22
Another great experience with Comfort Authority tech, Christopher Basso. He could not have been more helpful,courteous, respectful and understanding. Not only did he fixed a difficult issue to diagnose but he came back as promised when a few hours after he left the ac acted up again. He fixed that and stayed until he made sure nothing else would show up. Great tech and a great person with a fantastic attitude.
As usual, Comfort Authority delivered!
— Manuel Lopez | Google Review
Ura and alyssa were very nice and friendly. They answered our questions.
— Groot | Google Review
Wonderful experience!!! Professional service on time and clean!!!! Glen was professional and curious. I appreciate his prompt service.
— Janeen Stokes | Google Review
Glen was very nice and was able to figure out what happened with our AC unit and get it fixed. He also explained things very well.
— Anamecia Baxley | Google Review